Difference between revisions of "GBxCart RW Manual"
| Line 1: | Line 1: | ||
==Quick How to Use== | ==Quick How to Use== | ||
| − | + | ===For Windows=== | |
1. Download and Install Microsoft Visual C++ Redistributable Packages (x86 and x64) for Visual Studio 2015 – https://www.microsoft.com/en-us/download/details.aspx?id=53840 | 1. Download and Install Microsoft Visual C++ Redistributable Packages (x86 and x64) for Visual Studio 2015 – https://www.microsoft.com/en-us/download/details.aspx?id=53840 | ||
| Line 25: | Line 25: | ||
| − | + | ===For Linux/Mac=== | |
You may need to install this CH340G driver – https://github.com/adrianmihalko/ch340g-ch34g-ch34x-mac-os-x-driver | You may need to install this CH340G driver – https://github.com/adrianmihalko/ch340g-ch34g-ch34x-mac-os-x-driver | ||
| Line 39: | Line 39: | ||
If it has trouble connecting to the serial port, try running “ls /dev” and see if you can find a device similar to tty.chusbserial630. | If it has trouble connecting to the serial port, try running “ls /dev” and see if you can find a device similar to tty.chusbserial630. | ||
| − | If you find one similar, you will need to edit the rs232/rs232.c file, just replace one of the existing entries in the variable below: char *comports[RS232_PORTNR]={“/dev/ | + | If you find one similar, you will need to edit the rs232/rs232.c file, just replace one of the existing entries in the variable below: char *comports[RS232_PORTNR]={“/dev/ttyS0?,”/dev/ttyS1?,”/dev/ttyS2”, |
And then re-compile. | And then re-compile. | ||
| Line 49: | Line 49: | ||
==Troubleshooting== | ==Troubleshooting== | ||
| − | + | ===If no lights are showing when plugging in the device or the device isn’t being detected=== | |
• Try using a different USB cable (preferably a non-phone type USB cable). This Startech cable is know to work. | • Try using a different USB cable (preferably a non-phone type USB cable). This Startech cable is know to work. | ||
| Line 68: | Line 68: | ||
| − | + | ===If the GUI won’t connect=== | |
Make sure the COM port in device manager for CH340 is under COM20 | Make sure the COM port in device manager for CH340 is under COM20 | ||
| Line 85: | Line 85: | ||
| − | + | ===If game saves won’t restore=== | |
The battery may be too low. Check you can save on the cart itself by saving, powering off for 5-10 minutes, powering back on and checking the save is still there. | The battery may be too low. Check you can save on the cart itself by saving, powering off for 5-10 minutes, powering back on and checking the save is still there. | ||
| Line 96: | Line 96: | ||
==GUI Interface - Backup ROM, Backup save and Restore save== | ==GUI Interface - Backup ROM, Backup save and Restore save== | ||
| − | + | ===Setup=== | |
1. Download and Install Microsoft Visual C++ Redistributable Packages (x86 and x64) for Visual Studio 2015 - | 1. Download and Install Microsoft Visual C++ Redistributable Packages (x86 and x64) for Visual Studio 2015 - | ||
| Line 108: | Line 108: | ||
| − | + | ===Inserting/Removing Cartridges=== | |
[[File:Cart Inserted.png]] [[File:Cart Inserted2.png]] | [[File:Cart Inserted.png]] [[File:Cart Inserted2.png]] | ||
| Line 121: | Line 121: | ||
| − | + | ===Reading the Cartridge Information=== | |
[[File:Read Cart Info.png]] | [[File:Read Cart Info.png]] | ||
| Line 134: | Line 134: | ||
| − | + | ===Read the ROM=== | |
[[File:Read ROM.png]] | [[File:Read ROM.png]] | ||
| Line 143: | Line 143: | ||
| − | + | ===Backup save from Cartridge to PC=== | |
[[File:Backup Save.png]] | [[File:Backup Save.png]] | ||
| Line 156: | Line 156: | ||
| − | + | ===Restore save from PC to Cartridge=== | |
[[File:Restore Save.png]] | [[File:Restore Save.png]] | ||
| Line 163: | Line 163: | ||
| − | + | ===Erase save from cartridge=== | |
[[File:Erase Save.png]] | [[File:Erase Save.png]] | ||
| Line 170: | Line 170: | ||
| − | + | ===Change the directory to save to and load from=== | |
[[File:Change Dir.png]] | [[File:Change Dir.png]] | ||
| Line 182: | Line 182: | ||
| − | + | ===Add date/time to Save File and Prompt for Save Game file when restoring=== | |
[[File:Add Date Time.png]] | [[File:Add Date Time.png]] | ||
| Line 195: | Line 195: | ||
[[File:Console Interface.png]] | [[File:Console Interface.png]] | ||
| − | + | ===Windows Setup=== | |
1. Open \Interface_Programs\GBxCart_RW_vx.x_Console_Interface\GBxCart_RW_Console_vx.x.exe and the options menu should appear. | 1. Open \Interface_Programs\GBxCart_RW_vx.x_Console_Interface\GBxCart_RW_Console_vx.x.exe and the options menu should appear. | ||
| Line 202: | Line 202: | ||
| − | + | ===Linux/Mac Setup=== | |
1. Extract the software zip file (found in Downloads) and plug in GBxCart RW. | 1. Extract the software zip file (found in Downloads) and plug in GBxCart RW. | ||
| Line 214: | Line 214: | ||
If it has trouble connecting to the serial port, try running “ls /dev” and see if you can find a device similar to tty.chusbserial630. | If it has trouble connecting to the serial port, try running “ls /dev” and see if you can find a device similar to tty.chusbserial630. | ||
| − | If you find one similar, you will need to edit the rs232/rs232.c file, just replace one of the existing entries in the variable below: char *comports[RS232_PORTNR]={“/dev/ | + | If you find one similar, you will need to edit the rs232/rs232.c file, just replace one of the existing entries in the variable below: char *comports[RS232_PORTNR]={“/dev/ttyS0?,”/dev/ttyS1?,”/dev/ttyS2?,”/dev/ttyS3?,”/dev/ttyS4?, |
And then re-compile and try running the application again. | And then re-compile and try running the application again. | ||
| Line 221: | Line 221: | ||
| − | + | ===Inserting/Removing Cartridges=== | |
[[File:Cart Inserted.png]] [[File:Cart Inserted2.png]] | [[File:Cart Inserted.png]] [[File:Cart Inserted2.png]] | ||
| Line 234: | Line 234: | ||
| − | + | ===Reading the Cart Info=== | |
[[File:Console Cart Info.png]] | [[File:Console Cart Info.png]] | ||
| Line 245: | Line 245: | ||
| − | + | ===Read the ROM=== | |
[[File:Console Read ROM.png] | [[File:Console Read ROM.png] | ||
| Line 254: | Line 254: | ||
| − | + | ===Backup save from Cartridge to PC=== | |
[[File:Console Backup Save.png]] | [[File:Console Backup Save.png]] | ||
| Line 261: | Line 261: | ||
| − | + | ===Restore save from PC to Cartridge=== | |
[[File:Console Restore Save.png]] | [[File:Console Restore Save.png]] | ||
| Line 268: | Line 268: | ||
| − | + | ===Erase save from cartridge=== | |
[[File:Console Erase Save.png]] | [[File:Console Erase Save.png]] | ||
| Line 312: | Line 312: | ||
There are a few programs dedicated to the Nintendo Power Cart. | There are a few programs dedicated to the Nintendo Power Cart. | ||
| − | + | ===Backup Full ROM and Hidden Sector=== | |
Run npc_backup_full_rom_and_hidden_sector_vx.x to backup the full 1MB ROM and the hidden sector. This is useful if you wish to restore your cartridge back to how it was. | Run npc_backup_full_rom_and_hidden_sector_vx.x to backup the full 1MB ROM and the hidden sector. This is useful if you wish to restore your cartridge back to how it was. | ||
| Line 321: | Line 321: | ||
| − | + | ===Backup Multi-cart ROMs=== | |
If your cartridge has multiple games on it, run npc_backup_multi-cart_roms_vx.x to backup each game into its own ROM file. The ROM files will be in this format: NP_<Gametitle>_<Date>_<Time>.gb | If your cartridge has multiple games on it, run npc_backup_multi-cart_roms_vx.x to backup each game into its own ROM file. The ROM files will be in this format: NP_<Gametitle>_<Date>_<Time>.gb | ||
| − | + | ===Backup Multi-cart Saves=== | |
If your cartridge has multiple games on it, run npc_backup_multi-cart_save_games_vx.x to backup each game into its own save file. The save files will be in this format: NP_<Gametitle>_<Date>_<Time>.sav | If your cartridge has multiple games on it, run npc_backup_multi-cart_save_games_vx.x to backup each game into its own save file. The save files will be in this format: NP_<Gametitle>_<Date>_<Time>.sav | ||
| − | + | ===Restore Multi-cart Saves=== | |
If you wish to restore a save file to game if the cartridge has multiple games on it, drag and drop your save file to npc_restore_multi-cart_save_games_vx.x. It will then ask you which slot to restore it to and to confirm the action. | If you wish to restore a save file to game if the cartridge has multiple games on it, drag and drop your save file to npc_restore_multi-cart_save_games_vx.x. It will then ask you which slot to restore it to and to confirm the action. | ||
| − | + | ===Flasher=== | |
| − | [[File:NPC Flasher.png] | + | [[File:NPC Flasher.png]] |
If you wish to re-flash the cartridge to a single game, you can drag and drop your file to npc_flasher_vx.x. | If you wish to re-flash the cartridge to a single game, you can drag and drop your file to npc_flasher_vx.x. | ||
Revision as of 10:22, 10 March 2020
Contents
- 1 Quick How to Use
- 2 Troubleshooting
- 3 GUI Interface - Backup ROM, Backup save and Restore save
- 3.1 Setup
- 3.2 Inserting/Removing Cartridges
- 3.3 Reading the Cartridge Information
- 3.4 Read the ROM
- 3.5 Backup save from Cartridge to PC
- 3.6 Restore save from PC to Cartridge
- 3.7 Erase save from cartridge
- 3.8 Change the directory to save to and load from
- 3.9 Add date/time to Save File and Prompt for Save Game file when restoring
- 4 Console Interface - Backup ROM, Backup save and Restore save
- 5 Gameboy Camera Saver
- 6 GUI Flasher - Write ROMs to Flash Carts
- 7 Console Flasher - Write ROMs to Flash Carts
- 8 Nintendo Power Cart – Backup Full ROM/Hidden Sector, Backup Saves, Restore Saves, Flasher
Quick How to Use
For Windows
1. Download and Install Microsoft Visual C++ Redistributable Packages (x86 and x64) for Visual Studio 2015 – https://www.microsoft.com/en-us/download/details.aspx?id=53840
2. Extract the software zip file (found in Downloads) and plug in GBxCart RW. Windows will look for the CH340G driver. If the device isn’t automatically detected, you will need to open up Device manager, find the “USB 2.0 Serial” device and update the driver using the files in the Drivers folder.
3. Open up the GUI from Interface_Programs\GBxCart_RW_vx.x_GUI_Interface\GBxCart_RW_vx.x.exe. You can move this folder anywhere you like.
4. Unplug GBxCart RW
5. For v1.3 boards: You select the correct voltage via the software – the GB or GBA selection box in the GUI For v1.2 boards: Select the correct voltage for your cartridge using the switch (GB/GBC uses 5V while GBA uses 3.3V).
6. Insert your cartridge and then plug in GBxCart RW. Click the Connect button and the little USB icon should turn from grey to green.
7. You should now click “Read Cart Info” to read some basic information from the cartridge. Make sure you only continue if Logo Check is Ok. You can now backup the ROM, backup your save game to your PC and restore your save game to the cartridge.
For Linux/Mac
You may need to install this CH340G driver – https://github.com/adrianmihalko/ch340g-ch34g-ch34x-mac-os-x-driver
1. Extract the software zip file (found in Downloads) and plug in GBxCart RW.
2. Open a terminal window and change directory to the Console Interface (Interface_Programs\GBxCart_RW_vx.x_Console_Interface).
3. You will need to compile the application by typing in “sudo make”.
4. You can then run the application by typing in “sudo ./gbxcart_rw_console_v1.20” for example.
If it has trouble connecting to the serial port, try running “ls /dev” and see if you can find a device similar to tty.chusbserial630.
If you find one similar, you will need to edit the rs232/rs232.c file, just replace one of the existing entries in the variable below: char *comports[RS232_PORTNR]={“/dev/ttyS0?,”/dev/ttyS1?,”/dev/ttyS2”,
And then re-compile.
Please send us a quick email about the port you find so we can provide an official update.
Troubleshooting
If no lights are showing when plugging in the device or the device isn’t being detected
• Try using a different USB cable (preferably a non-phone type USB cable). This Startech cable is know to work.
• Try using a non-USB 3.0 port if you are using one.
• Try to unplug all other USB devices except your keyboard and mouse.
• Uninstall the device from Device Manager and choose to delete the driver files as well, then try to re-install the drivers and ensure the device shows as CH340.
• If it’s timing out when performing any of the functions:
• Try using a different USB cable (preferably a non-phone type USB cable).
• Check to see that you have no other software which monitors COM ports such as the Arduino IDE running in the background.
• Try using the Console Interface
If the GUI won’t connect
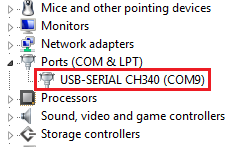
Make sure the COM port in device manager for CH340 is under COM20
Check the config.ini file matches the below. The first number is the com port number.
16
1000000
0
0
0
If game saves won’t restore
The battery may be too low. Check you can save on the cart itself by saving, powering off for 5-10 minutes, powering back on and checking the save is still there.
If that works, try using GBxCart to restore the save file, then back it up to another file and use a hex editor like HxD to compare the files. If they match, then it is likely something with the cartridge.
If you’ve tried all the above steps but are still experiencing issues, please contact us at support@insidegadgets.com
GUI Interface - Backup ROM, Backup save and Restore save
Setup
1. Download and Install Microsoft Visual C++ Redistributable Packages (x86 and x64) for Visual Studio 2015 - https://www.microsoft.com/en-us/download/details.aspx?id=53840
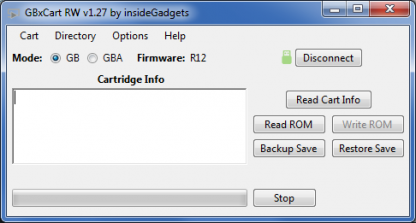
2. Open \Interface_Programs\GBxCart_RW_vx.x_GUI_Interface\GBxCart_RW_vx.x.exe and click the Connect button button. It should automatically detect the device and the little USB icon should turn from grey to green. For the v1.3 board - You should choose which mode you would like to select. For the 1.2 board and below - You will see the mode currently selected by the switch.
(If the little USB icon doesn’t turn green, please check that your system is detecting the CH340 device in the Device Manager)
Inserting/Removing Cartridges
1. Before inserting the cartridge, select the correct voltage for your cartridge using the switch (GB/GBC use 5V while GBA uses 3.3V). If you have the v1.3 board, this is controlled by software – in the GUI you choose GB or GBA mode and press connect. Connect the USB cable to ensure the correct voltage LED lights up.
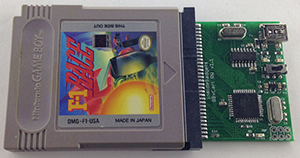
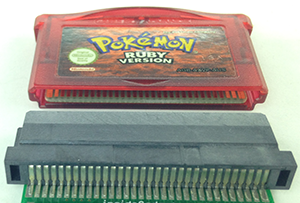
2. Unplug the device from your computer. Insert your cartridge to the device (make sure the cartridge sticker is facing up and that you can see the pins on the bottom of the cartridge), connect the device again and click Open Port as before.
3. You can now read the cart info, read the ROM, etc.
4. When removing cartridges, always unplug the USB cable from the device first before removing the cartridge.
Reading the Cartridge Information
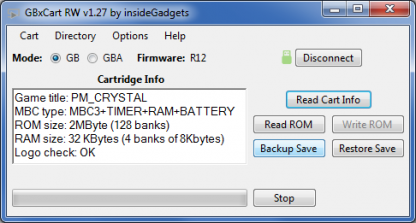
Press the Read Cart Info button and the cartridge information should show up (GBA carts can take 4 seconds as tests are being performed to determine the ROM and SRAM/Flash/EEPROM sizes). Note: You don’t need to read the cart info for Flash Carts.
Make sure that the “Logo check” comes back as OK otherwise the cartridge may not be read correctly and you will have to disconnect the device, remove and re-insert the cartridge.
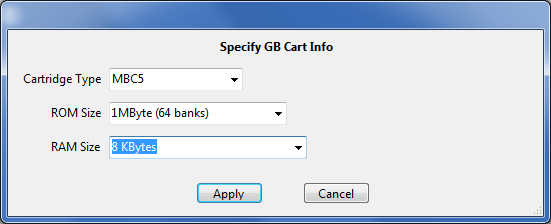
If the cartridge information doesn’t match what you know to be correct, you can select “Cart” from the top menu and select “Specify Cart Info” button to change the ROM size and RAM size/type.
Read the ROM
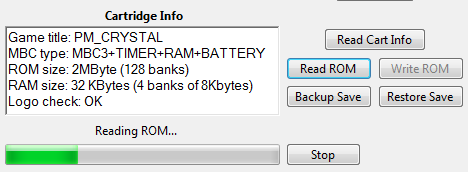
You can now press the “Read ROM” button to download the ROM from the cartridge to your PC, it will be saved as <Gametitle>.gb or <Gametitle>.gba.
We recommended verifying your Gameboy/Gameboy Advance ROMs and Saves by using emulators such as BGB for Gameboy and VisualBoyAdvance for Gameboy Advance.
Backup save from Cartridge to PC
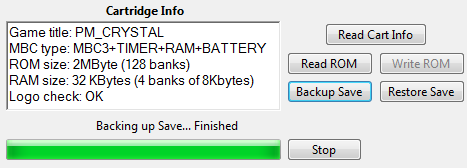
You can download the save game from your cartridge to your PC by pressing the “Backup Save” button, it will be saved as <Gametitle>.sav. If a save file exists on your PC, you will be asked to confirm you wish to overwrite the save file or save the file with the date/time added to it.
For Gameboy Advance cartridges, GBxCart tries to automatically detect the save type so every now and then it can get the save type wrong. You can go into Cart Info to adjust the save type settings.
If you are backing up a game regularly as you progress through it, it’s best to turn on the Option > “Always add date/time to backed up Save Game files” to Yes. This will add the date/time to your save file so you can have multiple save files on your PC.
We recommended verifying your Gameboy/Gameboy Advance ROMs and Saves by using emulators such as BGB for Gameboy and VisualBoyAdvance for Gameboy Advance.
Restore save from PC to Cartridge
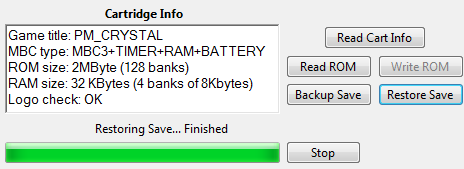
You can upload the save game from your PC to your cartridge by pressing the “Restore Save” button, it will load the save file <Gametitle>.sav. You will always be asked to confirm you wish to overwrite the save game on the cartridge.
Erase save from cartridge
You can erase the save game from the cartridge by pressing the “Cart” menu item and selecting “Erase Save”. You will always be asked to confirm. This is useful if you wish to wipe the cartridge and insert it back to the Gameboy/Gameboy Advance to start a new save.
Change the directory to save to and load from
You can change the directory where ROMs are saved to and where save games are saved to and loaded from. This might be useful if you have multiple saves for the same game.
When you click “Directory” in the menu it will advise you the folder where you opened the software from. You can then click the folder listed and it will let you change the folder location.
To always remember the location, make sure “Remember” is set to Yes.
Add date/time to Save File and Prompt for Save Game file when restoring
The “Always add date/time to backed up Save Game files” option is useful if you are backing up a game regularly as you progress through it. This will add the date/time to your save file so you won’t overwrite your existing save file, for example, F1RACE_2018.02.25-15.33.12.sav.
The “Always prompt for Save Game file when restoring” option will allow you to choose your save file to restore, this is useful if you use the option above.
Console Interface - Backup ROM, Backup save and Restore save
Windows Setup
1. Open \Interface_Programs\GBxCart_RW_vx.x_Console_Interface\GBxCart_RW_Console_vx.x.exe and the options menu should appear.
2. If the device couldn’t be autoamatically detected, open the \Interface_Programs\GBxCart_RW_vx.x_Console_Interface\config.ini file and change the first number to your COM port, e.g. 9 = COM9 and change the second number to the baud rate, default is 1Mbit (1000000) which should work fine. Your COM port can be found in device manager.
Linux/Mac Setup
1. Extract the software zip file (found in Downloads) and plug in GBxCart RW.
2. Open a terminal window and change directory to the Console Interface (Interface_Programs\GBxCart_RW_vx.x_Console_Interface)
3. You will need to compile the application by typing in "sudo make".
4. You can then run the application by typing in "sudo ./gbxcart_rw_console_v1.20" for example.
If it has trouble connecting to the serial port, try running “ls /dev” and see if you can find a device similar to tty.chusbserial630.
If you find one similar, you will need to edit the rs232/rs232.c file, just replace one of the existing entries in the variable below: char *comports[RS232_PORTNR]={“/dev/ttyS0?,”/dev/ttyS1?,”/dev/ttyS2?,”/dev/ttyS3?,”/dev/ttyS4?,
And then re-compile and try running the application again.
Please send us a quick email about the port you find so we can provide an official update.
Inserting/Removing Cartridges
1. Before inserting the cartridge, select the correct voltage for your cartridge using the switch (GB/GBC use 5V while GBA uses 3.3V). If you have the v1.3 board, this is controlled by software – in the GUI you choose GB or GBA mode and press connect. Connect the USB cable to ensure the correct voltage LED lights up.
2. Unplug the device from your computer. Insert your cartridge to the device (make sure the cartridge sticker is facing up and that you can see the pins on the bottom of the cartridge), connect the device again and click Open Port as before.
3. You can now read the cart info, read the ROM, etc.
4. When removing cartridges, always unplug the USB cable from the device first before removing the cartridge.
Reading the Cart Info
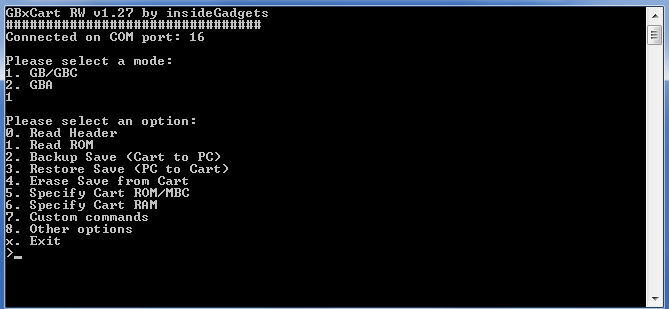
Press “0” and hit enter to read the cartridge information. Make sure that the “Logo check” comes back as OK otherwise the cartridge may not be read correctly and you will have to disconnect the device, remove and re-insert the cartridge.
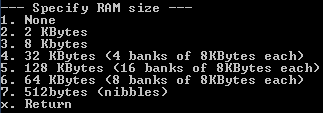
If the cartridge information doesn’t match what you know to be correct, you can press “4” or “5” and hit change the ROM size and RAM size/type.
Read the ROM
[[File:Console Read ROM.png]
You can press “1” and hit enter to button to download the ROM from the cartridge to your PC, it will be saved as <Gametitle>.gb or <Gametitle>.gba.
We recommended verifying your Gameboy/Gameboy Advance ROMs and Saves by using emulators such as BGB for Gameboy and VisualBoyAdvance for Gameboy Advance.
Backup save from Cartridge to PC
You can download the save game from your cartridge to your PC by pressing “2” and hit enter, it will be saved as <Gametitle>.sav. If a save file exists on your PC, you will be asked to confirm you wish to overwrite the save file.
Restore save from PC to Cartridge
You can upload the save game from your PC to your cartridge by pressing “3” and hit enter, it will load the save file <Gametitle>.sav. You will always be asked to confirm you wish to overwrite the save game on the cartridge.
Erase save from cartridge
You can erase the save game from the cartridge by pressing “4” and hit enter. You will always be asked to confirm. This is useful if you wish to wipe the cartridge and insert it back to the Gameboy/Gameboy Advance to start a new save.
Gameboy Camera Saver
This program is useful if you are constantly using the Gameboy Camera and wish to save the images quickly to BMP files. Found in the \Interface_Programs\GBxCart_RW_GBCamera_Saver_vx.x folder.
Automatically creates a folder with the current date/time (<year>-<month>-<date>_<hour>-<minute>-<second>), saves the GB camera memory to this folder and extracts the active (non-deleted) images from the save to separate BMP files labelled 1.bmp to 30.bmp. It’s a good idea to check the images created match the images stored on the GB Camera.
If you wish to change where the folder is created, you can create a config-folder.ini file and enter in the directory where you wish the folder should be created in.
GUI Flasher - Write ROMs to Flash Carts
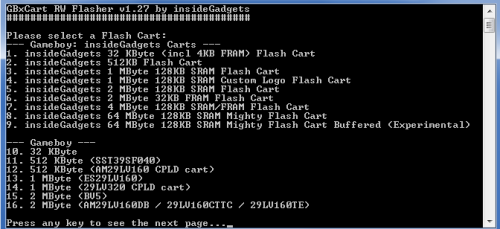
This program is useful if you would like to select your flash cart from a list and select the ROM file to write. Found in the \GBxCart_RW_Flasher_vx.xx\GBxCart_RW_GUI_Flasher_vx.xx folder.
Console Flasher - Write ROMs to Flash Carts
This program is useful if you would like drag and drop interface to write ROMs to your flash carts. Found in the \GBxCart_RW_Flasher_vx.xx\GBxCart_RW_Console_Flasher_vx.x folder.
Open the program first and enter in the Flash Cart you will be writing the ROM to. Make sure you exit the program.
Now within Windows Explorer, you can drag and drop your ROM file to gbxcart_rw_flasher_vx.x.exe without having to select the Flash cart type again.
You can also call the following from a command prompt: gbxcart_rw_flasher_vx.x.exe <location_to_rom_file.gb>
Nintendo Power Cart – Backup Full ROM/Hidden Sector, Backup Saves, Restore Saves, Flasher
There are a few programs dedicated to the Nintendo Power Cart.
Backup Full ROM and Hidden Sector
Run npc_backup_full_rom_and_hidden_sector_vx.x to backup the full 1MB ROM and the hidden sector. This is useful if you wish to restore your cartridge back to how it was.
The Full ROM will be in this format: NP_1MB_ROM_Backup_<Date>_
The hidden sector will be in this format: NP_HiddenSector_<Date>_
Backup Multi-cart ROMs
If your cartridge has multiple games on it, run npc_backup_multi-cart_roms_vx.x to backup each game into its own ROM file. The ROM files will be in this format: NP_<Gametitle>_<Date>_
Backup Multi-cart Saves
If your cartridge has multiple games on it, run npc_backup_multi-cart_save_games_vx.x to backup each game into its own save file. The save files will be in this format: NP_<Gametitle>_<Date>_
Restore Multi-cart Saves
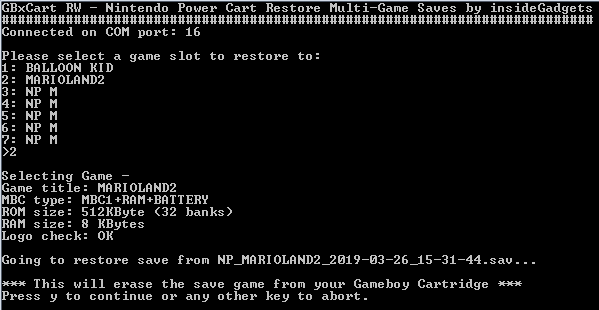
If you wish to restore a save file to game if the cartridge has multiple games on it, drag and drop your save file to npc_restore_multi-cart_save_games_vx.x. It will then ask you which slot to restore it to and to confirm the action.
Flasher
If you wish to re-flash the cartridge to a single game, you can drag and drop your file to npc_flasher_vx.x.
If you wish to use the cartridge for multiple games, please follow these steps.
1. Run the “Backup Multi-cart ROM” as you will need the menu ROM file. Rename the menu ROM file to Menu.gb. If you no longer have the menu ROM file, please contact us at support@insidegadgets.com and we will provide it to you.
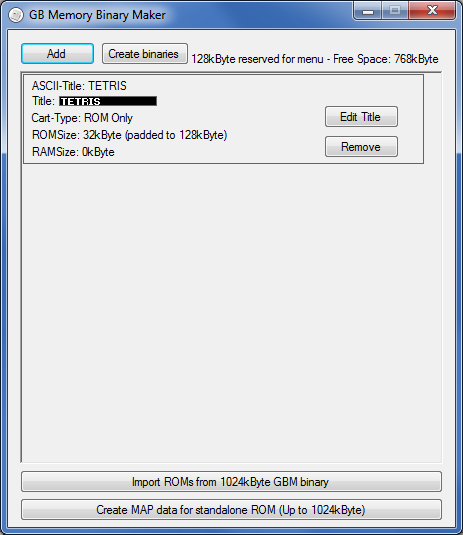
2. Download GB Memory Binary Maker (https://github.com/Infinest/GB-Memory-Binary-Maker/releases) and copy the Menu.gb file to the location where you extracted GB Memory Binary Maker.
3. Open GB Memory Binary Maker and add in your ROMs by clicking Add, selecting your ROM file and giving it a custom game title if you like.
4. Once all the ROMs have been added, click create binaries.
5. Drag and drop the ROM file to npc_flasher_vx.x. It will also restore the .map file too (hidden sector).
